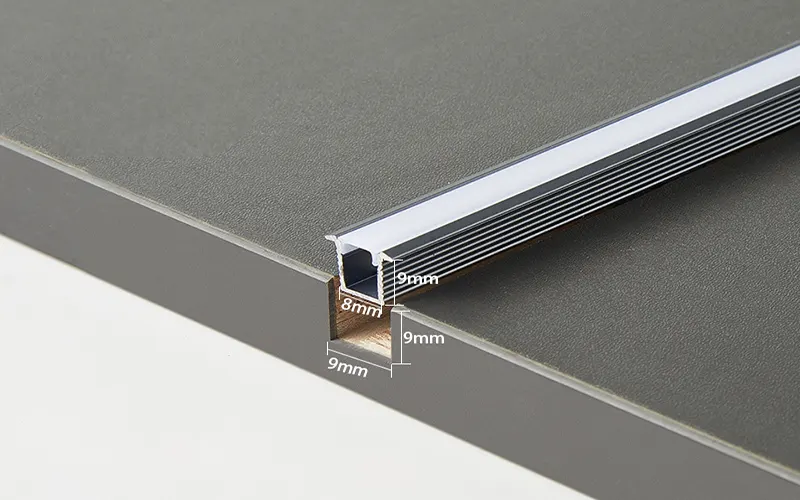
When you use aluminum LED strips, you’ll find that the common sizes are 1 meter/pcs, 2 meters/pcs, and 3 meters/pcs. But the space you install it in is different, which conforms to these common lengths. So you may need to adjust its length according to the installation space, which requires precise cutting of aluminum LED channels. More information, pls read 2024 Ultimate Guide for LED Aluminum Profile
In this article, we’ll walk you through everything you need to know about cutting aluminum LED channels, measures to step-by-step instructions for achieving a perfect cut.
Why You Need to Cutting Aluminum LED Channels?
Mainly, during installation, the installation site does not match the size of the LED profile. And there are also some corners where the LED profile and strip need to be cut to the right length.
Customized LED Aluminum Lengths
Aluminum LED strips come in standard sizes, usually 1 to 2 meters in length. However, the length of LED strips installed varies from project to project. So we need to cutting aluminum LED channels to customize them so that they fit perfectly in your space.
Maximize Use
Cutting aluminum LED channels also minimizes waste. So if the size doesn’t match, we need to cut the LED profiles and strips to length to ensure you only use the part you need, saving materials and costs.
Tools Needed to Cutting Aluminum LED Channels
If you need to cutting aluminum LED channels, then you can prepare the following tools. This way you can also try to cut them yourself.
1. Hacksaw
A common and easy-to-use tool for cutting aluminum LED trough light is a fine-toothed hacksaw. This hand tool allows for precise control, especially for DIY projects or small cuts. It cuts clean, smooth cuts on the aluminum without jagged edges.
2. Miter Saw
The adjustable angle of the miter saw allows for precise cuts at a variety of angles, making it ideal for installations that require more complex configurations.
3. Tape Measure and Marker
When cutting aluminum LED channels, accurate measurements are essential. Before cutting, always measure the desired length and clearly mark it with a marker or pencil.
4. Clamp
Clamps are essential to keep the aluminum LED channel stable during the cutting process. This ensures a clean, straight cut and prevents the channel from moving or bending under pressure.
5. File or Sandpaper
After cutting the channel, rough edges or burrs may remain. You will need to use a metal file or fine sandpaper to smooth the edges, make the channel more secure, and improve the overall appearance.
How to Cutting an Aluminum LED Channels: A Step-by-Step Guide
Step 1: Measure and Mark the Channel
Before you begin cutting, measure the length of the aluminum channel to fit your project. Use a tape measure to get the exact dimensions and mark the locations where you want to cut with a marker or pencil. Make sure the markings are clearly visible to guide your cuts.
Step 2: Secure the Channel with Clamps
Once you have marked the cutting points, secure the aluminum LED channel to a stable surface, such as a workbench, with clamps. Make sure the channel is securely fastened to avoid any movement during the cutting process. Stability is key to achieving clean, straight cuts.
Step 3: Choose the Right Cutting Tool
Choose the right tool for your cutting job. For straight cuts, a hacksaw or miter saw are ideal, while a rotary tool is better for smaller, more delicate cuts. Make sure the blade is appropriate for cutting the metal to avoid damaging the channel or creating jagged edges.
Step 4: Make the Cut
Begin cutting slowly and steadily, applying even pressure throughout the process. Avoid rushing, as this can cause the blade to jump or make uneven cuts. If using a miter saw, slowly lower the saw to make a clean cut, and when using a hacksaw, use long, steady strokes.
Step 5: File the Edges
After cutting, the aluminum channel may have rough edges or burrs on it. Use a metal file or fine sandpaper to smooth the edges. This not only makes the channel safer, but also improves the final appearance after installation.
Step 6: Test the Fit
Before completing the installation, place the cut aluminum LED channel in the intended space to ensure it fits perfectly. If necessary, make additional adjustments by filing or trimming excess material.
Safety Precautions When Cutting Aluminum LED Channels
1. Wear Safety Glasses
When cutting aluminum, it’s best to wear safety glasses to protect your eyes from flying debris or metal shavings.
2. Wear Gloves
After cutting, the aluminum edges may be sharp, so it is important to wear gloves to protect your hands from cuts or scrapes.
3. Work in a well-ventilated area
Cutting aluminum creates fine particles or dust. Make sure you work in a well-ventilated space to avoid breathing these particles, and consider wearing a mask for added protection.
4. Check blade condition
Before cutting, check the blade of your saw or cutting tool to make sure it is in good condition. A dull or damaged blade will result in a poor cut and increase the risk of injury.
Conclusion
Cutting aluminum LED channels is a simple task, but it requires the right tools, careful measurements, and attention to detail. We offer custom lengths for our LED profiles, and also can help you cut the right length to fit your project.